Introduction
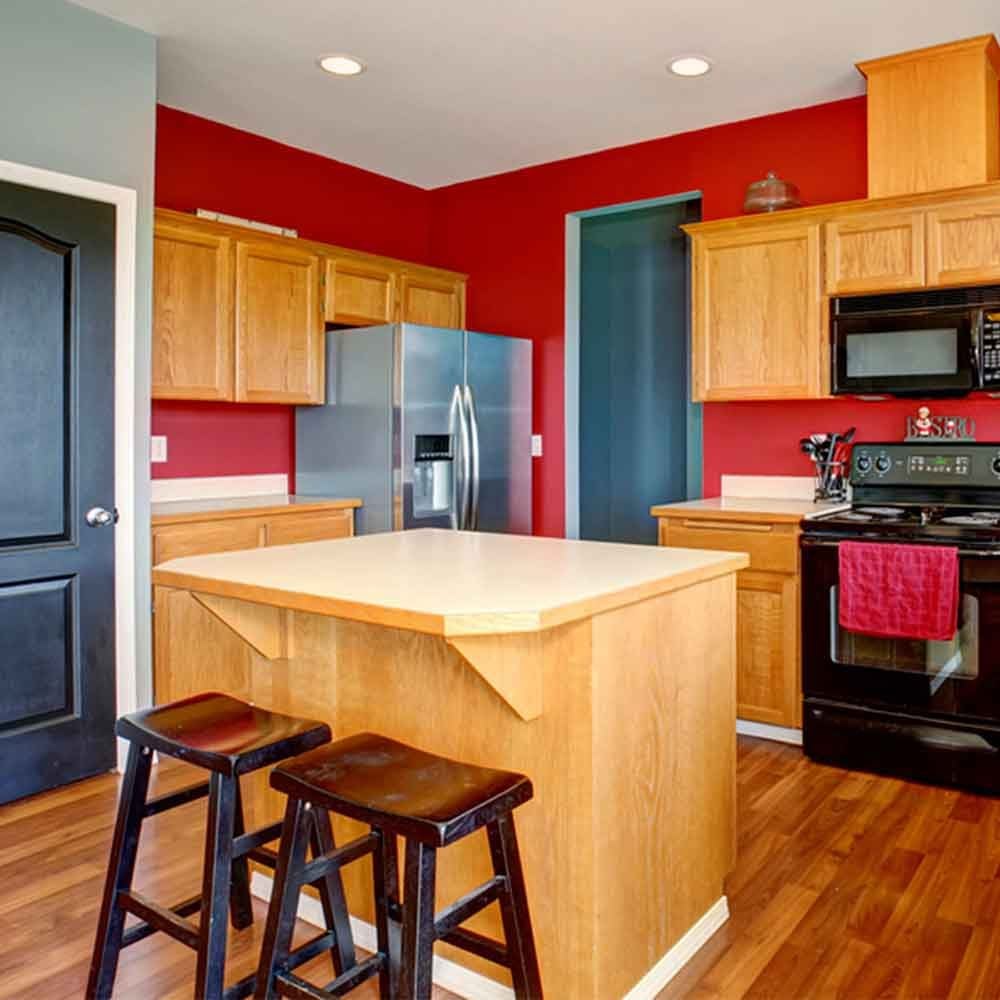
The allure of high-end interior design lies in its ability to transform a house into a home that reflects personal style and elevates everyday living. Luxurious interiors often evoke feelings of comfort, sophistication, and serenity, creating spaces that are both aesthetically pleasing and functionally efficient. However, achieving this level of design often comes with a hefty price tag, placing it out of reach for many. This article explores the exciting concept of “luxury on a budget,” demonstrating how to achieve a high-end look and feel in your home without breaking the bank. We will delve into practical strategies and cost-effective choices that allow you to create a luxurious interior that reflects your unique taste and budget.
Defining Luxury on a Budget
The idea of “luxury on a budget” is not about sacrificing quality or style; it’s about making smart choices and strategic investments. It involves carefully curating pieces, prioritizing quality over quantity, and utilizing clever design techniques to maximize impact. This approach focuses on creating a cohesive and sophisticated atmosphere through thoughtful selections of materials, furniture, and accessories, rather than relying solely on expensive brand names. Instead of purchasing numerous inexpensive items, the focus shifts to investing in fewer, higher-quality pieces that will last and elevate the overall aesthetic. For example, choosing one statement piece of furniture, such as a luxurious velvet sofa, can anchor a room and create a sense of opulence without needing to replace all the furniture. Similarly, investing in high-quality textiles, such as a luxurious rug or richly textured curtains, can significantly enhance the overall feeling of luxury.
Paint and Color Schemes
Transforming your walls with paint is one of the most impactful and affordable ways to elevate your interior design. A well-chosen color scheme can instantly create a sense of luxury, even on a tight budget. The key lies in understanding the psychology of color and the subtle differences in paint finishes.
Luxury on a Budget: Affordable Interior Upgrades That Look Expensive – Strategic use of color and sheen can dramatically alter the perception of space and create a sophisticated atmosphere. Deep, rich hues often associated with high-end design can be achieved with budget-friendly paint brands, while careful consideration of the paint finish ensures a professional and polished look. The following sections explore how to maximize your impact with paint.
Luxury-Evoking Paint Colors
Certain colors inherently convey a sense of opulence and sophistication. Deep jewel tones such as emerald green, sapphire blue, and amethyst purple create a dramatic and luxurious feel. Warm neutrals like greige (a blend of gray and beige), warm white, and taupe offer a more understated elegance. Subtle variations in these shades can create a luxurious, layered effect. For example, a deep emerald green used on an accent wall can be complemented by a lighter shade of the same color on adjacent walls, creating visual depth and interest. Similarly, a warm white can be paired with a slightly off-white for a sophisticated contrast. These colors, when used strategically, can create a high-end feel without the high-end price tag.
Impact of Different Paint Finishes
The finish of your paint significantly impacts the overall look and feel of a room. Matte finishes offer a sophisticated, understated look, hiding imperfections in the walls and creating a calming atmosphere. Satin finishes provide a subtle sheen, offering a balance between durability and elegance, and are ideal for high-traffic areas. Gloss finishes offer the highest shine and durability, reflecting light and creating a sense of spaciousness, but can highlight wall imperfections. Choosing the right finish depends on the room’s function and desired aesthetic. For instance, a matte finish might be perfect for a bedroom to create a relaxing ambiance, while a satin finish might be more suitable for a hallway or living room where durability is important. A gloss finish might be a good choice for trim or accent pieces to add a pop of shine and highlight details.
Sample Living Room Paint Palette
This palette demonstrates how to combine high-end color inspiration with budget-friendly paint options. The key is to focus on quality application rather than solely relying on expensive brands for a luxurious finish.
| Color | Description | High-End Brand Example (Approximate Cost) | Budget-Friendly Brand Example (Approximate Cost) |
|---|---|---|---|
| Warm White | Creates a bright, airy base | Benjamin Moore White Dove ($50/gallon) | Valspar Ultra White ($25/gallon) |
| Greige | Sophisticated neutral for main walls | Sherwin-Williams Agreeable Gray ($55/gallon) | Behr Swiss Coffee ($30/gallon) |
| Deep Teal | Accent wall for a pop of color | Farrow & Ball Hague Blue ($110/gallon) | Rust-Oleum Painter’s Touch 2X Ultra Cover Deep Teal ($15/gallon) |
Lighting
Lighting is arguably the most transformative element in interior design, capable of dramatically altering the mood, functionality, and perceived value of a space. A well-planned lighting scheme can make a small room feel larger, a dark corner feel inviting, and even inexpensive materials appear luxurious. Mastering this aspect, especially on a budget, is key to achieving an upscale look without breaking the bank.
Layered lighting is crucial for creating depth and visual interest. It involves combining different types of lighting to achieve a balanced and dynamic illumination. This technique moves beyond a single overhead fixture, adding depth and dimension to the room’s ambiance. By strategically incorporating ambient, task, and accent lighting, you can create a sophisticated and inviting atmosphere that feels both warm and luxurious.
Ambient Lighting: Setting the Mood
Ambient lighting provides overall illumination, setting the foundation for the room’s atmosphere. Think of it as the base layer of your lighting scheme. Instead of relying solely on a single, harsh overhead light, consider using multiple sources for a softer, more diffused glow. Cost-effective options include strategically placed floor lamps with warm-toned bulbs, affordable LED ceiling panels (easily installed and readily available at most home improvement stores), or even creatively arranged fairy lights tucked into shelves or behind furniture for a whimsical touch. A warm white or soft yellow bulb temperature will create a cozy and inviting feeling, while cooler tones can feel more sterile and less luxurious.
Task Lighting: Functional Illumination
Task lighting focuses on specific areas where activities take place, such as reading, cooking, or working. This type of lighting is essential for functionality and prevents eye strain. Affordable options include clip-on lamps for reading nooks, adjustable desk lamps for workspaces, or under-cabinet lighting for kitchens. Consider using LED strip lights under kitchen cabinets – these are inexpensive, energy-efficient, and offer bright, focused illumination on countertops. The key is to choose fixtures that are both functional and aesthetically pleasing, complementing the overall design scheme.
Accent Lighting: Highlighting Focal Points
Accent lighting is used to highlight specific features or objects, adding visual interest and drama to the room. This can be achieved through affordable means such as strategically placed spotlights to illuminate artwork, decorative sconces flanking a fireplace, or even creatively using table lamps to showcase a statement piece of furniture. Using inexpensive LED spotlights can highlight artwork, architectural details, or even textured walls, drawing attention to key areas and creating visual depth. Remember to choose fixtures that complement the overall style of the room.
Creating a Lighting Mood Board
A mood board is an invaluable tool for visualizing your lighting scheme. Begin by gathering images of lighting fixtures that appeal to you, focusing on styles, shapes, and finishes that align with your desired aesthetic. Next, organize these images alongside swatches of your paint colors and fabric textures. Consider including images of rooms with similar lighting schemes to illustrate how different fixtures impact the overall ambiance. This visual representation allows you to experiment with different combinations and ensure that your lighting choices complement your overall design vision before making any purchases, minimizing the risk of costly mistakes.
Textiles and Fabrics
Transforming your interior with luxurious textiles doesn’t require a king’s ransom. By carefully selecting fabrics and employing smart sourcing strategies, you can achieve a high-end look without breaking the bank. This section explores how to elevate your space using affordable yet sophisticated textiles.
The allure of high-end fabrics like silk, linen, and velvet is undeniable. Their rich textures, lustrous sheen, and inherent quality contribute to an undeniably luxurious feel. However, these premium materials often come with a hefty price tag. Fortunately, numerous budget-friendly alternatives offer comparable visual appeal and tactile experience. For example, polyester blends can mimic the drape of silk at a fraction of the cost, while cotton blends can provide a similar softness to linen. Understanding these alternatives allows for cost-effective design choices.
Budget-Friendly Sources for Luxurious Textiles
Finding luxurious-looking textiles without emptying your wallet is achievable through strategic shopping. Discount stores often offer surprisingly high-quality fabrics at significantly reduced prices, particularly during seasonal sales or clearance events. Imagine discovering a bolt of velvet in a deep emerald green, perfect for accent pillows, at a fraction of the price found in a specialty fabric store. Online marketplaces, such as Etsy and eBay, present another avenue for uncovering unique and affordable textiles. Many independent sellers offer handcrafted fabrics and remnants, often at competitive prices. Thrift stores and antique shops also represent hidden gems; you might find vintage fabrics with unique patterns and textures, ready for a second life in your home.
Reupholstering a Chair: A Step-by-Step Guide
Reupholstering a chair is a rewarding project that allows for significant aesthetic improvement using affordable fabric. This process can dramatically transform an outdated chair into a stunning focal point, adding a touch of personalized luxury to your space. Remember, proper preparation is key to a successful outcome.
- Preparation: Begin by carefully removing the old fabric from the chair. Take detailed photos and notes as you disassemble the piece to aid in reassembly. This meticulous approach ensures a smoother process later. Clean the underlying frame and padding thoroughly, ensuring everything is in good repair before proceeding. Any necessary repairs should be addressed before the new fabric is applied.
- Fabric Selection and Measurement: Choose your budget-friendly fabric. Consider the existing chair’s style and your overall interior design when selecting color and pattern. Accurately measure the required fabric, adding extra for seams and potential mistakes. Remember to account for pattern matching, if applicable.
- Cutting and Sewing: Carefully cut the fabric according to your measurements and patterns. Pay attention to detail and ensure precise cuts to avoid fabric waste and achieve a professional finish. Use a sewing machine for consistent stitching, or hand-sew for a more artisanal approach. Remember to use appropriate seam allowances.
- Reassembly: Follow your initial disassembly notes to reassemble the chair, carefully attaching the new fabric. Take your time and ensure everything is aligned correctly. Staple guns are typically used to secure the fabric to the frame, but hand-sewing is also an option for a more durable and less visible finish.
- Finishing Touches: Once the chair is reupholstered, inspect your work for any loose threads or imperfections. Make any necessary adjustments and enjoy your newly transformed, luxurious-looking chair.
Furniture
Strategic furniture selection is paramount in achieving a luxurious look on a budget. The key lies in choosing pieces that make a statement, rather than filling every space with numerous inexpensive items. By focusing on quality over quantity, and employing clever repurposing techniques, you can dramatically elevate your interior design without breaking the bank.
Choosing statement pieces involves identifying key areas in your room and selecting furniture that commands attention. This doesn’t necessarily mean the most expensive pieces; rather, it means items with unique design elements, high-quality materials (even if used or repurposed), or a striking silhouette. A single, well-chosen sofa, a beautifully crafted coffee table, or a striking armchair can transform the entire feel of a room.
Affordable Furniture Sources
Many retailers offer surprisingly high-quality furniture at affordable prices. Online marketplaces often feature gently used or refurbished pieces at significant discounts. Consider exploring options such as Wayfair, Overstock, and even Facebook Marketplace for hidden gems. Additionally, many home improvement stores offer stylish and durable furniture lines at competitive price points. Remember to carefully check reviews and compare prices before making a purchase. Focusing on classic designs ensures your pieces will remain stylish for years to come, maximizing their value.
Refinishing and Repurposing Furniture
Refinishing or repurposing existing furniture is a fantastic way to create unique, luxurious-looking pieces. A simple coat of paint can dramatically change the appearance of an old dresser or side table. Consider using high-quality paint with a sheen finish for a more upscale look. For more advanced projects, you can explore techniques like decoupage, where decorative paper or fabric is applied to the furniture surface. Replacing old hardware with new, elegant knobs or pulls can also instantly elevate the look of a piece. Repurposing involves creatively adapting existing furniture for a new function. An old ladder could become a unique bookshelf, while vintage suitcases could be transformed into stylish side tables. The possibilities are limited only by your imagination and DIY skills.
Accessories and Decor
Adding the right accessories is crucial in transforming a space from simply furnished to truly luxurious. Even on a budget, carefully chosen decorative items can elevate the overall aesthetic, creating a high-end feel without the high-end price tag. This section will explore affordable options and DIY projects that achieve this effect.
Affordable Accessories for a Luxurious Feel
Strategic placement of carefully selected accessories can dramatically impact the perceived value of a room. Mirrors, for example, not only add a sense of spaciousness but also reflect light, making a room feel brighter and more expansive – a hallmark of luxury design. Similarly, well-chosen vases, even simple ones in elegant shapes or colors, can add sophistication. Finally, throw pillows in rich textures and jewel tones instantly elevate a sofa or bed, providing both visual interest and comfort. Consider using a mix of materials like velvet, linen, or faux fur to add depth and visual interest. These items, readily available at affordable price points in various home goods stores and online marketplaces, can make a significant difference.
DIY Decor Projects for Elevated Style
Numerous DIY projects can significantly enhance the appearance of a space without breaking the bank. Repurposing existing items is a great starting point. For example, an old wooden crate can be transformed into a stylish coffee table with a coat of paint and some new hardware. Similarly, empty glass jars can be painted and used as vases or candle holders. Creating your own artwork, such as framed botanical prints or abstract paintings using affordable paints and canvases, adds a personal touch and significantly reduces costs compared to purchasing pre-made artwork. Upcycling old furniture with a fresh coat of paint or new upholstery is another effective strategy. These projects, while requiring time and effort, offer substantial cost savings and a unique, personalized touch that elevates the overall look.
Styled Bookshelf: A Visual Representation
A well-styled bookshelf can be a focal point, showcasing personality and taste while adding a layer of sophistication. The following example illustrates how to achieve a luxurious look using affordable accessories:
- Base: A simple, light-colored wooden bookshelf. This provides a neutral backdrop that allows the accessories to stand out.
- Books: A mix of hardcover books with varying colors and textures. Arrange them vertically and horizontally for visual interest. Consider placing some books horizontally with their spines facing outward to break up the uniformity.
- Decorative Objects: A small, elegant ceramic vase with a single, dried flower. A small, framed black and white photograph. A stack of vintage-looking coasters. A small, decorative box with an interesting texture or pattern.
- Color Palette: Stick to a neutral color palette with pops of color. For example, use creams, whites, and blacks as the base, and add accents of gold or deep teal.
- Lighting: Consider adding a small, adjustable lamp to highlight specific objects on the shelf and create a warm ambiance.
This arrangement creates a visually appealing and sophisticated bookshelf without relying on expensive designer items. The key is to balance the items, creating visual harmony and avoiding clutter. The result is a luxurious and personalized display that reflects style and personality.
DIY Projects
Unleashing your creative potential through DIY projects is a fantastic way to personalize your interior and achieve a luxurious look without breaking the bank. By repurposing materials and employing simple techniques, you can create stunning pieces that reflect your unique style and add significant value to your home. This section will guide you through three impactful DIY projects: crafting a custom headboard, sewing luxurious throw pillows, and designing a gallery wall using thrifted or repurposed frames.
Custom Headboard Creation
Creating a custom headboard is simpler than you might think. This project allows for immense personalization, enabling you to tailor the design, size, and materials to perfectly complement your existing bedroom décor. A simple yet elegant headboard can dramatically elevate the overall feel of the room.
A basic approach involves using a large piece of plywood as the base. Imagine a headboard approximately 4 feet wide and 2 feet tall. You can source a piece of plywood from a home improvement store for a relatively low cost. Once you have your plywood, you can choose to upholster it. A foam padding layer, about an inch thick, provides comfort and support. This foam is then covered with your chosen fabric, secured with a staple gun. For a luxurious feel, consider using velvet or a high-quality linen. Alternatively, you could paint the plywood a striking color or apply wallpaper for a more modern aesthetic. The final step involves attaching sturdy brackets to the back of the plywood, allowing you to easily secure the headboard to your bed frame. Remember to measure carefully and pre-drill holes to prevent the plywood from splitting.
Luxurious Throw Pillow Construction, Luxury on a Budget: Affordable Interior Upgrades That Look Expensive
Throw pillows are an inexpensive way to inject personality and texture into any room. By selecting luxurious-looking fabrics and employing a simple sewing technique, you can create beautiful pillows that look far more expensive than they actually are.
Begin by choosing your fabric. Velvet, linen, or even high-quality cotton with an interesting pattern can create a sophisticated look. Measure and cut two identical pieces of fabric, adding seam allowance (about ½ inch) to each side. You will also need filling; high-loft polyester fiberfill is a budget-friendly and comfortable option. Pin the two fabric pieces together, right sides facing inwards. Sew along three sides, leaving one side open for filling. Turn the fabric right side out, and fill with the fiberfill until plump but not overly stuffed. Finally, hand-stitch or use a sewing machine to close the remaining opening. Consider adding decorative trim or buttons for an extra touch of elegance.
Gallery Wall Design Using Thrifted or Repurposed Frames
A gallery wall is a fantastic way to showcase your personal style and add visual interest to a room. This project involves curating a collection of frames, selecting artwork or photographs, and arranging them on the wall to create a cohesive and stylish display. Using thrifted or repurposed frames is an economical and environmentally conscious approach.
Start by sourcing frames from thrift stores, flea markets, or even by repurposing old picture frames you already own. Consider varying sizes and styles for a more eclectic look. Once you have your frames, you can either use existing artwork or create your own. You can print out high-quality images from online sources or use your own photographs. Before arranging the frames, lay them out on the floor to visualize the final arrangement. This allows you to experiment with different configurations and ensure a balanced and aesthetically pleasing display. Once you are satisfied with the arrangement, carefully measure and mark the wall before hanging the frames using appropriate picture hanging hardware. Ensure the frames are level and evenly spaced.
Upcycling and Repurposing

Upcycling and repurposing are invaluable techniques for achieving a luxurious look on a budget. By transforming existing items, you can create unique and stylish pieces that add character and personality to your home without breaking the bank. This approach not only saves money but also reduces waste, contributing to a more sustainable lifestyle. The possibilities are endless, limited only by your imagination and a little creativity.
Repurposing and upcycling offer a fantastic opportunity to personalize your interior design. Instead of buying brand-new items, you can breathe new life into old furniture, decor, and even everyday objects, creating one-of-a-kind pieces that reflect your personal style. This section will explore various techniques and provide practical examples to inspire your next upcycling project.
Upcycling Old Furniture
Transforming old furniture is a rewarding way to add character and unique style to your home. A well-worn dresser can be updated with a fresh coat of paint and new hardware, instantly elevating its appearance. Similarly, an outdated armchair can be reupholstered with a luxurious fabric, giving it a completely new lease on life. Consider adding decorative molding or updating the legs for an even more dramatic transformation. For example, a simple wooden chair could be painted a vibrant color, distressed for a vintage look, and then fitted with new cushions in a contrasting pattern. This simple process could transform a discarded piece into a statement chair.
Repurposing Thrift Store and Flea Market Finds
Thrift stores and flea markets are treasure troves of potential upcycling projects. You can find unique pieces at incredibly low prices, offering a fantastic opportunity to add character and personality to your home. Look for items with good bones – solid construction that can withstand some modification. Old picture frames can be repurposed as wall shelves, vintage suitcases can become unique coffee tables, and old crates can be transformed into stylish storage solutions. The key is to look beyond the item’s current state and envision its potential. For instance, a worn wooden crate could be sanded, painted, and lined with fabric to create a charming storage unit for blankets or throws.
Transforming Old Jars into Elegant Storage Containers
Old jars, from various food items or candles, can be easily transformed into elegant storage containers. Start by thoroughly cleaning and drying the jars. Remove any existing labels, ensuring all adhesive residue is gone. Then, consider painting the jars in a consistent color or using decoupage techniques to add patterns or images. You can also add decorative elements like ribbon, twine, or lace around the necks of the jars. For example, simple mason jars can be painted a matte black and fitted with elegant lids to store cotton balls, Q-tips, or other bathroom essentials, adding a touch of rustic chic to the space. This process allows you to create beautiful and functional storage solutions without spending a fortune.
Mirrors and Reflections
Mirrors are a powerful tool in interior design, offering a surprisingly effective way to enhance both the perceived size and brightness of a room, especially beneficial for smaller spaces. Strategically placed mirrors can create the illusion of depth and openness, transforming a cramped area into one that feels airy and spacious. This section explores how to leverage the reflective power of mirrors to achieve a luxurious look without the luxury price tag.
Mirrors strategically positioned can visually expand a room’s dimensions. By reflecting light and creating a sense of depth, they can make a small living room feel significantly larger. The placement is crucial; a mirror placed opposite a window will dramatically increase the amount of natural light in the room, while a mirror reflecting a well-decorated area can double the visual impact of that area. The size and shape of the mirror also play a role in the overall effect. Larger mirrors have a more pronounced effect on space, while smaller mirrors can be used to highlight specific features or add subtle reflective accents.
Types of Mirrors and Their Design Impact
Different types of mirrors offer varying aesthetic impacts and price points. The choice of mirror frame and its material significantly influence the overall design style. A simple, unframed mirror provides a clean, modern look, while an ornate gilded frame adds a touch of classic elegance. The mirror itself can also have different finishes, such as antique, smoked, or beveled, each impacting the reflective quality and the visual effect on the room.
Mirror Placement for Maximizing Light and Space in a Small Living Room
Consider a small living room approximately 10ft x 12ft with a single window on one of the 12ft walls. To maximize both light and space, a large, floor-length mirror (approximately 6ft x 3ft) could be placed on the wall opposite the window. This will reflect the natural light deep into the room, making it appear brighter and more spacious. A smaller, decorative mirror (approximately 2ft x 2ft) could be placed above a console table or mantelpiece, reflecting light and adding a decorative focal point. In addition, a series of smaller, identically framed mirrors could be arranged on a blank wall to create a striking gallery wall that further enhances the feeling of spaciousness. This arrangement cleverly uses mirrors to amplify the natural light and visually expand the room’s dimensions, offering a stylish and affordable solution.
Mirror Types and Costs
| Mirror Type | Description | Approximate Cost Range |
|---|---|---|
| Plain Mirror | Simple, unframed mirror; often found in standard sizes. | $10 – $50 |
| Framed Mirror (Simple Frame) | Mirror with a basic frame, typically made of wood or plastic. | $20 – $100 |
| Ornate Framed Mirror | Mirror with an elaborate frame, potentially including decorative elements like carvings or metallic finishes. | $50 – $300+ |
| Full-Length Mirror | Tall, slender mirror designed for full-body reflection. | $30 – $200+ |
| Specialty Mirror (e.g., beveled, antique) | Mirrors with unique finishes or designs. | $40 – $500+ |
Plants and Greenery
Incorporating plants into your interior design is a remarkably effective way to elevate the aesthetic appeal of your home while simultaneously boosting your well-being. Plants introduce natural elements, softening hard lines and adding texture and visual interest to any space, regardless of its size or style. They contribute to a sense of calm and tranquility, improving air quality and creating a more inviting atmosphere. The strategic placement of plants can also subtly define areas within a room or draw the eye to specific focal points.
Plants offer a surprisingly affordable avenue to achieve a high-end look. Many readily available, low-maintenance plants can create a lush and vibrant atmosphere without breaking the bank. Careful selection and placement amplify their visual impact, allowing even a few strategically chosen specimens to significantly enhance the overall design.
Choosing Affordable and Visually Appealing Plants
Numerous inexpensive yet visually striking plants are perfect for budget-conscious interior design. Snake plants, ZZ plants, and pothos are renowned for their resilience and adaptability, thriving even in low-light conditions. These plants require minimal care, making them ideal for busy individuals. Spider plants, with their cascading foliage, offer a dramatic effect, while succulents provide a modern, minimalist touch with their diverse textures and forms. Consider the specific lighting conditions and humidity levels in your home when selecting plants to ensure their long-term health and vibrancy. A little research can go a long way in choosing plants that will not only look beautiful but also thrive in your environment.
Arranging Plants to Enhance Room Aesthetics
The arrangement of plants significantly impacts their visual impact. Consider these guidelines for creating a cohesive and visually pleasing display:
- Vary Heights and Textures: Combine tall, slender plants with shorter, bushier ones to create visual depth and interest. Mix plants with varying leaf textures—smooth, leathery, or feathery—for a more dynamic display. For example, a tall bamboo plant could be paired with a low-growing fern and a succulent for a varied and visually interesting grouping.
- Grouping Plants: Clustering plants together creates a sense of fullness and impact, particularly effective in corners or along empty wall spaces. Use varying sizes of pots to avoid a monotonous look. For instance, three pots of varying sizes and colors filled with snake plants of differing heights could create a stunning focal point.
- Strategic Placement: Consider the existing furniture and décor when placing plants. Plants can soften sharp corners, fill empty spaces, or frame a window or fireplace. A large floor plant can anchor a seating area, while smaller plants can be strategically placed on shelves or side tables to add visual interest.
- Pot Selection: The pot is an important design element. Consider using pots of different materials (ceramic, terracotta, woven baskets) and colors to complement your existing décor. Simple, elegant pots can enhance the overall look without distracting from the plants themselves. For example, a single, large plant in a sleek, modern ceramic pot can make a bold statement.
- Maintaining Balance: Avoid overcrowding a space with too many plants. A well-curated selection is more impactful than a haphazard collection. Leave some breathing room between plants to prevent them from looking cluttered. A balanced arrangement will create a sense of calm and visual harmony in the room.
Budgeting and Planning
Transforming your home’s interior on a budget requires careful planning and a realistic budget. This section provides a step-by-step guide to help you create a financial plan that aligns with your vision and financial capabilities, ensuring a successful and stress-free renovation. Understanding your spending limits and prioritizing upgrades is crucial for achieving a luxurious look without overspending.
Creating a Detailed Budget
Begin by meticulously listing all planned upgrades. This includes materials, labor costs (if hiring professionals), and any unforeseen expenses. Allocate specific amounts to each item, being realistic about potential price fluctuations. Research costs beforehand by visiting home improvement stores, comparing online prices, and obtaining quotes from contractors. Remember to factor in sales tax and potential delivery fees. A well-defined budget prevents overspending and keeps your project on track.
Prioritizing Upgrades and Spreading Costs
Prioritize upgrades based on their impact and necessity. High-impact, relatively inexpensive changes, such as a fresh coat of paint or new lighting fixtures, should be tackled first. Larger, more expensive projects, like replacing flooring or installing built-in shelving, can be phased in over time. This allows you to spread the cost and enjoy the transformation gradually. Consider creating a timeline for your project, breaking down larger tasks into smaller, manageable phases. For example, you might repaint one room this month, upgrade the lighting in another next month, and save for new flooring the following quarter.
Sample Budget Spreadsheet
The following table provides a sample budget spreadsheet. Remember to adjust these figures based on your specific needs and location. Prices for materials and labor can vary significantly depending on your region and the quality of the products you choose.
| Upgrade Category | Item | Estimated Cost |
|---|---|---|
| Paint & Color Schemes | Paint (2 gallons), brushes, rollers | $100 |
| Lighting | 3 new pendant lights | $200 |
| Textiles & Fabrics | New curtains for living room | $150 |
| Furniture | Secondhand sofa (refurbished) | $300 |
| Accessories & Decor | Throws, cushions, artwork (thrifted/DIY) | $50 |
| DIY Projects | Materials for a simple headboard | $40 |
| Upcycling & Repurposing | Materials for refinishing an old table | $30 |
| Mirrors & Reflections | Large mirror for hallway | $75 |
| Plants & Greenery | Various plants and pots | $60 |
| Total Estimated Cost | $905 |
Remember: This is a sample budget. Your actual costs may vary. Always add a contingency buffer (10-20%) to account for unexpected expenses.
FAQ Overview: Luxury On A Budget: Affordable Interior Upgrades That Look Expensive
What are some common mistakes to avoid when decorating on a budget?
Common mistakes include rushing into purchases without a plan, neglecting proper lighting, and choosing low-quality materials that won’t last. Thorough planning and prioritizing key areas for improvement are crucial.
Where can I find affordable, high-quality paint?
Many home improvement stores offer sales and discounts on quality paints. Consider exploring less-known brands that still provide excellent coverage and durability at a lower price point.
How can I make my small space feel more luxurious?
Maximize light with mirrors, use a cohesive color palette, and choose furniture with clean lines to avoid clutter. Strategic placement of plants can also add a touch of luxury.
What are some easy DIY projects for beginners?
Simple projects include creating a gallery wall with thrifted frames, reupholstering throw pillows, or painting an accent wall. Start with projects that require minimal tools and experience.